This is part 4 of my Learning Swift Calculator App.
Progress:
- UI elements will be evenly distributed on any size screen and orientation.
Lessons learned:
Autolayout is a wonderful thing and Apple does their best to help developers who would prefer to develop using the GUI rather than code, but, if you don’t understand the underlying concepts, using the GUI doesn’t help at all.
This tutorial helped me understand the general concepts of Autolayout:
This tutorial was more helpful with the step by step details on how to distribute components across a screen:
All in all, it was straightforward once I understood what constraints mean and how to define them. Â Once I figured it out, there was a lot of repetitive steps applying the same constraints to different elements – I am not sure if there’s an easier way to do so.
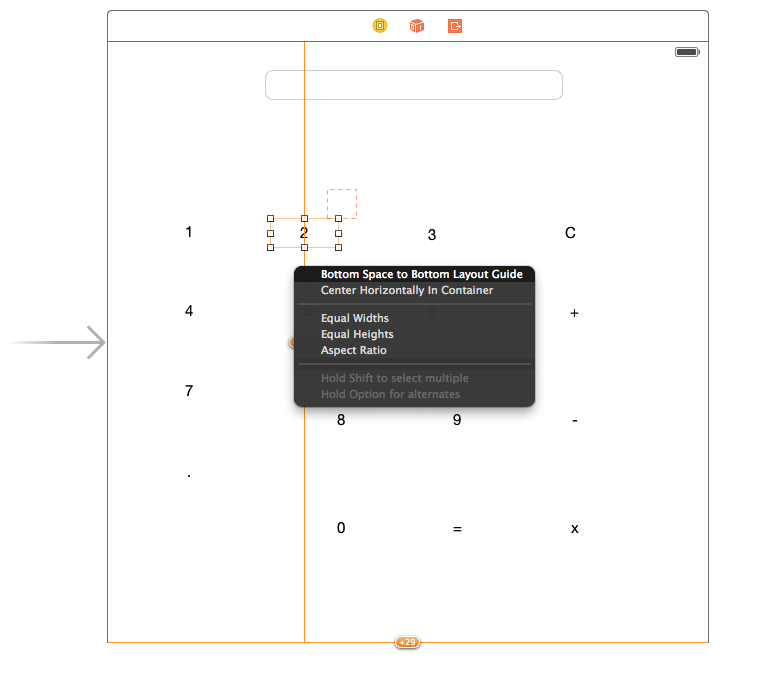
The basic premise is actually very simple. Â You define the X or Y coordinates of an elements in relation to the view. Â You can do it as a decimal value, so my four columns of buttons (1, 2, 3, and C) were 0.2, 0.4, 0.6, and 0.8 respectively. Â xCode6 beta does not recognize the value if I put in .2. Â You have to put in the zero.
Also, when you ctrl+drag an object, the direction of the drag gives you a contextual menu. Â For example, when you drag down, it will let you select “Bottom Space” and when you drag right, it will let you select “Trailing Space.” Â This confused me for a while, but it’s a nice touch by Apple.

I haven’t experimented with the size constraints much, but you can also give elements minimum and/or maximum sizes, so that they will resize properly when the orientation is changed or if the app is run on different screen size devices.
Lastly, again, I am not sure if I am missing something, but when constraints are defined, they are not reflected on the storyboard. Â Instead, when you click on an element, you see where the element will go based on constraints in a box with dotted lines. Â This is a bit different than what was shown in the video tutorial linked above. Â Maybe it is an xCode preference or maybe I just need to change some view setting.

Here’s all the project files: download (.zip 71kb)
Here’s the code so far; however, you can’t see all the autolayout work on this code.
//
//  ViewController.swift
//  Calculator
//
//  Created by Jin S. An on 10/1/14.
//  Copyright (c) 2014 jinsungpsu.com. All rights reserved.
//

import UIKit

class ViewController: UIViewController {

    var displayString = ""

    @IBOutlet var calcDisplay: UITextField!
    @IBOutlet var btn01: UIButton!
    @IBOutlet var btn02: UIButton!
    @IBOutlet var btn03: UIButton!
    @IBOutlet var btn04: UIButton!
    @IBOutlet var btn05: UIButton!
    @IBOutlet var btn06: UIButton!
    @IBOutlet var btn07: UIButton!
    @IBOutlet var btn08: UIButton!
    @IBOutlet var btn09: UIButton!
    @IBOutlet var btnDecimal: UIButton!
    @IBOutlet var btn00: UIButton!
    @IBOutlet var btnEqual: UIButton!
    @IBOutlet var btnClear: UIButton!
    @IBOutlet var btnPlus: UIButton!
    @IBOutlet var btnMinus: UIButton!
    @IBOutlet var btnMultiply: UIButton!

    override func viewDidLoad() {
        super.viewDidLoad()
        // Do any additional setup after loading the view, typically from a nib.
        btn01.showsTouchWhenHighlighted = true;
        btn02.showsTouchWhenHighlighted = true;
        btn03.showsTouchWhenHighlighted = true;
        btn04.showsTouchWhenHighlighted = true;
        btn05.showsTouchWhenHighlighted = true;
        btn06.showsTouchWhenHighlighted = true;
        btn07.showsTouchWhenHighlighted = true;
        btn08.showsTouchWhenHighlighted = true;
        btn09.showsTouchWhenHighlighted = true;
        btn00.showsTouchWhenHighlighted = true;
        btnDecimal.showsTouchWhenHighlighted = true;
        btnEqual.showsTouchWhenHighlighted = true;
        btnClear.showsTouchWhenHighlighted = true;
        btnPlus.showsTouchWhenHighlighted = true;
        btnMinus.showsTouchWhenHighlighted = true;
        btnMultiply.showsTouchWhenHighlighted = true;
        self.view.backgroundColor = UIColor.lightGrayColor()
    }

    override func didReceiveMemoryWarning() {
        super.didReceiveMemoryWarning()
        // Dispose of any resources that can be recreated.
    }

    func updateCalculatorDisplay(buttonPressed: String) {

        switch (buttonPressed) {
        case ".","1","2","3","4","5","6","7","8","9","0":
            displayString += buttonPressed
        case "-","+","x":
            displayString += " " + buttonPressed + " "
        default:
            displayString += buttonPressed
        }
        calcDisplay.text = displayString
    }

    @IBAction func calc01(sender: AnyObject) {
        updateCalculatorDisplay("1")
    }
    @IBAction func calc02(sender: AnyObject) {
        updateCalculatorDisplay("2")
    }
    @IBAction func calc03(sender: AnyObject) {
        updateCalculatorDisplay("3")
    }
    @IBAction func calc04(sender: AnyObject) {
        updateCalculatorDisplay("4")
    }
    @IBAction func calc05(sender: AnyObject) {
        updateCalculatorDisplay("5")
    }
    @IBAction func calc06(sender: AnyObject) {
        updateCalculatorDisplay("6")
    }
    @IBAction func calc07(sender: AnyObject) {
        updateCalculatorDisplay("7")
    }
    @IBAction func calc08(sender: AnyObject) {
        updateCalculatorDisplay("8")
    }
    @IBAction func calc09(sender: AnyObject) {
        updateCalculatorDisplay("9")
    }
    @IBAction func calcDecimal(sender: AnyObject) {
        updateCalculatorDisplay(".")
    }
    @IBAction func calc00(sender: AnyObject) {
        updateCalculatorDisplay("0")
    }
    @IBAction func calcPlus(sender: AnyObject) {
        updateCalculatorDisplay("+")
    }
    @IBAction func calcMinus(sender: AnyObject) {
        updateCalculatorDisplay("-")
    }
    @IBAction func calcMultiply(sender: AnyObject) {
        updateCalculatorDisplay("x")
   }
    @IBAction func calcEqual(sender: AnyObject) {
        var tempArray = displayString.componentsSeparatedByString(" ")
        var currentOperation = "initial"
        var calculatedValue:Float = 0.0;
        for tempValue in tempArray {
            switch (tempValue) {
                case "+":
                    currentOperation = "+"
                case "-":
                    currentOperation = "-"
                case "x":
                    currentOperation = "x"
                case "%":
                    currentOperation = "%"
                default:
                    switch (currentOperation) {
                        case "+":
                            calculatedValue += (tempValue as NSString).floatValue
                        case "-":
                            calculatedValue -= (tempValue as NSString).floatValue
                        case "x":
                            calculatedValue *= (tempValue as NSString).floatValue
                       case "initial":
                            calculatedValue = (tempValue as NSString).floatValue
                        default:
                            calculatedValue += 0.0
                    }
            }
        }
        displayString = "=" + calculatedValue.description
        calcDisplay.text = displayString
    }
    @IBAction func calcClear(sender: AnyObject) {
        displayString = ""
        calcDisplay.text = ""
    }
}